Power Up Your Presentations: A Guide to Using VBA in PowerPoint
In this comprehensive guide, we’ll explore how to use the power of VBA (Visual Basic for Applications) within PowerPoint, boosting your productivity by automating tasks and creating dynamic presentations.
Why Use VBA in PowerPoint?
While PowerPoint offers a range of built-in features, VBA unlocks a new level of customization and automation. You can update multiple slides with a single click, create interactive elements, or dynamically link data from an Excel spreadsheet. VBA makes all these a reality.
How to Get Started with VBA in PowerPoint
1. Save as Macro-Enabled Presentation
The first thing that you need to do is to save your presentation file as a PowerPoint Macro-Enabled Presentation (*.pptm). This allows your presentation file to contain VBA code. To do this:
- Go to File > Save As and choose a location to save your file.
- In the Save as type dropdown menu, select PowerPoint Macro-Enabled Presentation (*.pptm). [3]
Saving in the .pptm format signals to PowerPoint that the file contains macros (VBA code) and should be treated accordingly. Standard .pptx files cannot store VBA code. [3]
2. Activate the Developer Tab
The Developer tab is how you add VBA code in PowerPoint. It is not displayed by default. Here’s how to activate it:
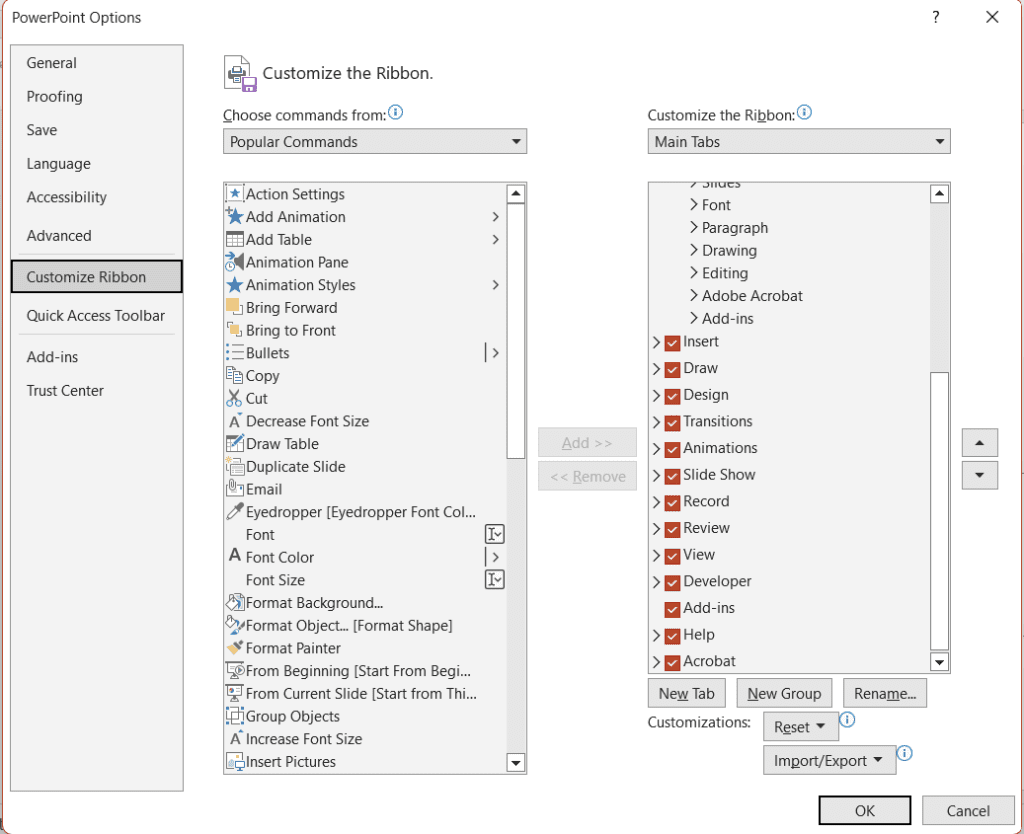
- Navigate to File > Options > Customize Ribbon.
- On the right-hand side, locate the Developer checkbox and ensure it’s ticked.
- Confirm by clicking OK. The Developer tab will now appear in the PowerPoint ribbon.
The Developer tab is where you can find the essential VBA tools including the Visual Basic editor for writing code, macro management options, and controls for creating interactive elements.
3. Uncover Object Names
Before writing your VBA code, you need to know the precise names of the objects you want to manipulate. PowerPoint assigns unique names to each element within a slide. Here’s how to find them:

- Select the object you want to work with (e.g., a title textbox, a shape, or an image).
- When the Shape Format tab appears in the ribbon, click on Selection Pane.
- A panel will open on the right, listing all objects on the current slide with their corresponding names.
VBA relies on accurate object names to interact with specific elements. By using the exact name of the elements that you want to manipulate, you can ensure that your code works properly. Incorrect names will lead to errors in your code and relying on general names is also a common reason for code breaking down.
Writing Your First VBA Code
Now let’s dive into writing a simple PowerPoint VBA macro to showcase some possibilities. In this example, we will automatically change the title and subtitle text on the first slide of the presentation.
4. Insert a VBA Module
Modules serve as containers for your VBA code within the PowerPoint project. This helps keep your code organized:

- Go to the Developer tab and click Visual Basic.
- In the Visual Basic editor, click Insert > Module.
5. Crafting the Code
Within the newly created module, type the following code:
Sub TitleSubtitleChange()
    With ActivePresentation.Slides(1)
        .Shapes("Title 1").TextFrame.TextRange.Text = "I changed the title"
        .Shapes("Subtitle 2").TextFrame.TextRange.Text = "This is the change"
    End With
End Sub
Let’s break down the code to see what each line does:
- Sub TitleSubtitleChange(): This line defines the start of a procedure named “TitleSubtitleChange.” Procedures are blocks of code that perform specific tasks.
- With ActivePresentation.Slides(1): This line indicates we are working with the active presentation and specifically its first slide.
- .Shapes(“Title 1”).TextFrame.TextRange.Text = “I changed the title”: This line targets the shape named “Title 1” on the first slide, accesses its text frame, and changes the text content to “I changed the title.”
- .Shapes(“Subtitle 2”).TextFrame.TextRange.Text = “This is the change”: This line performs a similar action, changing the text of the shape named “Subtitle 2” to “This is the change.”
- End With: This line ends the “With” block.
- End Sub: This line signifies the end of the procedure.
VBA Best Practices
Writing clean, efficient, and understandable code is crucial, especially when collaborating with others or revisiting your work in the future. Here are some best practices:
- Meaningful Naming: Use descriptive names for your procedures, variables, and constants. A name like “UpdateSlideTitles” is much more informative than “Sub1.”
- Comments: Explain complex logic or the purpose of specific code sections using comments. Comments start with an apostrophe (‘).
- Indentation: Properly indent your code to visually represent the code’s structure and hierarchy, making it easier to read.
- Modularization: Break down large tasks into smaller, manageable procedures. This improves reusability and makes debugging simpler.
- Testing: Thoroughly test your code with various scenarios to ensure it behaves as intended.
6. Running Your VBA Code
You’ve written the code, now it’s time to see it in action:
- Save your code within the Visual Basic editor.
- Click the green “Run” button (or press F5) to execute your code.
- Switch back to your PowerPoint presentation to witness the title and subtitle on the first slide change automatically.
Beyond the Basics: Exploring VBA’s Potential
If you learn better by watching, here’s a video that explains the steps. Follow along and you’ll have a better idea of where to click and what to type:
This is just a glimpse of what you can do with VBA in PowerPoint. Here are some other things that you could explore doing:
- Link Excel data to PowerPoint to create dynamic charts and tables that update automatically.
- Build interactive quizzes or feedback forms within your presentations.
- Automate repetitive formatting tasks, such as applying a specific design to all slides.
VBA is a relatively easy skill to master and by doing so, you can transform your PowerPoint presentations as well as your presentation creation process.



I’m really enjoying the theme/design of your site.
Do you ever run into any internet browser compatibility problems?
A handful of my blog visitors have complained about my site not
working correctly in Explorer but looks great in Safari.
Do you have any solutions to help fix this issue?
Compatibility is a big problem. I am not sure how to correct it but looking for themes where the comments say they are compatible would be a good place to start.